Android is the one of the most engaging technology by Google for the handheld devices. Before era of android most of us are believing in Symbian Os and using it with number of limitation like it is not open source, less number of applications, less number of features etc. The other major mobile manufacturing Apple developed their Os called iOs which is one of the advanced mobile operating system with extensive set of features but it can’t be afford by normal people to take the benefit of iOs functionality.
Android comes with many features included in iOs and all functionality that is being used in mobile handheld device. As we know android is open source OS then we can build an application by self and add it to device or publish It to net. Many developers in the world are now switching to android app development and they earn good money as well. In this tutorial we are going to tell you about the steps that you need to begin the android app development carrier.
So first of all in this post we are considering the all codes compile and run by Eclipse IDE so you have to download and install following tools before moving to next step:
Step 1:
Once you have installed the above listed tools then you are set your computer for the programming now follow these steps to code a simple “hello world” program for android platform.
Step2:
- Open the Eclipse IDE.
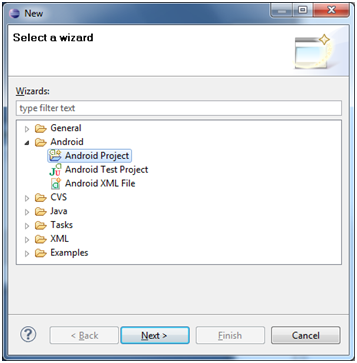
- In Eclipse, select File > New > Project.
- Select “Android Project” and click next.
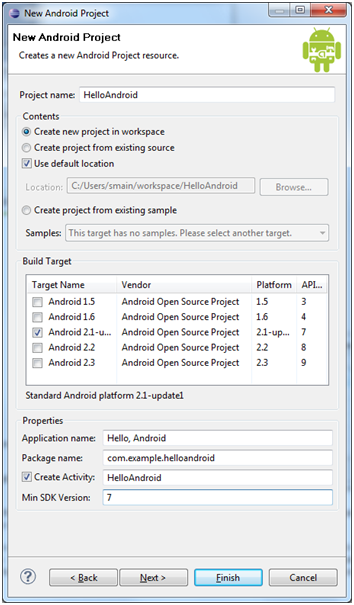
Now fill following Details of your new project.
- Project name: HelloAndroid
- Build Target: Select a platform version that is equal to or lower than the target you chose for your AVD.
- Application name: Hello Android
- Package name: com.example.helloandroid
- Create Activity: HelloAndroid
Click Finish.
Now you are ready to do some code in your android app now find HelloAndroid.java from the package explorer tab on left of Eclipse IDE. It should be in HelloAndroid > src > com.example.helloandroid.
Once you find the select the file now the source file is open in front of you with some little inbuilt code. It looks like this.
package com.example.helloandroid;
import android.app.Activity;
import android.os.Bundle;
public class HelloAndroid extends Activity {
/** Called when the activity is first created. */
@Override
public void onCreate(Bundle savedInstanceState) {
super.onCreate(savedInstanceState);
setContentView(R.layout.main);
}
}
Here is the little quick review of code:
If you are familiar with little much about java then you can understand it quickly else don’t worry guys click here and learn basic of java. In above code the Activity is class which contains many functions which is used to perform actions. OnCreate() method is initiated when the Android app starts. It is where you can perform many initialization functions and task.
Now let’s move to next step and will add some line to above code to print “hello world” on screen.
package com.example.helloandroid;
import android.app.Activity;
import android.os.Bundle;
import android.widget.TextView;
public class HelloAndroid extends Activity {
/** Called when the activity is first created. */
@Override
public void onCreate(Bundle savedInstanceState) {
super.onCreate(savedInstanceState);
TextView tv = new TextView(this);
tv.setText(“Hello, Android”);
setContentView(tv);
}
}
We just add the highlighted text above in code let me explain what it is:
TextView():- It is a class in android package used to handle the text formatting.
setText() :- it is a class in android package used to set the position and text on screen.
setContentView():- used to display the content on screen.
Now after the code just Run the program by following steps given below:
- Select Run > Run.
- Select “Android Application”.
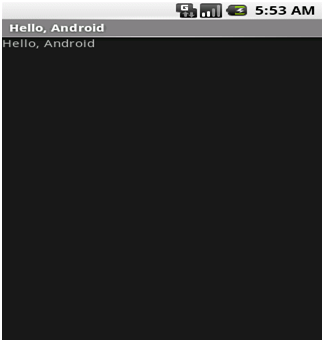
Here you done and you are successfully executed your first android application……….congratz.!!!!!!
Hope this post helps you to begin your programming in android app development.
Show your interest in form of comments.
Good luck.


This is awesome, thank you so much!
Thanks For visiting on our site. And Thanks for your Nice comment 🙂
Join our FREE mailing list and stay updated with the latest happenings.